What are 20 Items in an Emergency Kit? Your Complete Guide
Find out what are 20 items in a emergency kit and how to build a kit that keeps your family safe during wildfires, power outages, and other emergencies.

In the first hours of an emergency, you are your own first responder. Official help can be minutes or even hours away, and having a plan is your most powerful asset. A well-stocked emergency kit is the core of that plan. It’s the tangible proof that you are ready to handle a crisis, providing the food, water, first aid, and communication tools you need to keep your family safe. This isn't about preparing for a far-off possibility; it's about building resilience for a known threat. To get started, you need a clear, actionable checklist. This guide provides exactly that, answering the critical question of what are 20 items in a emergency kit and showing you how to customize it for your family.
Key Takeaways
- Think beyond a single kit: True preparedness means having multiple, specialized kits. Build a large kit for sheltering at home, a compact one for your car, and a lightweight "grab-and-go" bag for immediate evacuations.
- Customize your kit for your real life: A generic checklist isn't enough. Tailor your supplies to your family by including specific medications, items for children and infants, pet necessities, and critical wildfire gear like N95 masks.
- Treat your kit like a living resource: Your kit isn't a time capsule. Set a recurring six-month reminder to swap out expired food and water, test your gear, and update supplies to reflect your family's current needs.
Why an Emergency Kit is Non-Negotiable
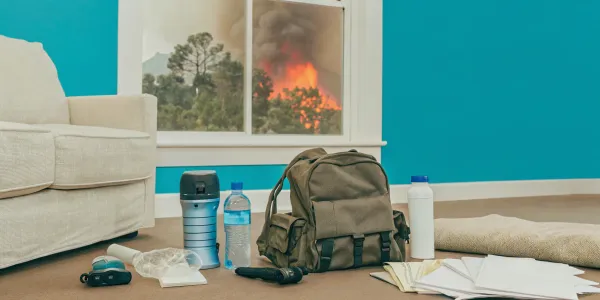
When an evacuation order comes, you have minutes, not hours. An emergency kit isn’t just a good idea; it’s a critical tool that buys you time and peace of mind. Think of it as your personal safety net for the first 72 hours of a crisis, when official help might be overwhelmed or unable to reach you. For homeowners in wildfire zones, preparing a kit is one of the most powerful steps you can take to protect your family. It shifts your mindset from reacting in a panic to executing a plan with confidence, giving you a sense of control when everything feels chaotic.
What Does "Being Prepared" Actually Mean?
"Being prepared" can sound like a huge, overwhelming task, but it boils down to one simple concept: self-sufficiency. It means having a dedicated collection of items ready so your household can manage on its own during an emergency. This isn't about hoarding supplies; it's about thoughtfully assembling the food, water, first aid, and communication tools you'll need when stores are closed and services are down. A proper emergency kit allows you to shelter in place or evacuate without making risky, last-minute trips for essentials, ensuring you have what you need, right when you need it most.
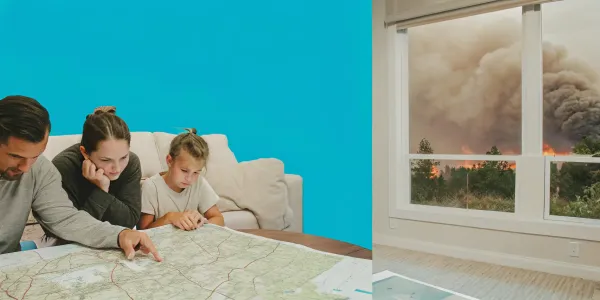
Why You Need a Plan Before Disaster Strikes
The moments before an evacuation are chaotic and stressful. Adrenaline is high, and it’s nearly impossible to think clearly and remember every essential item. That’s precisely why you need a kit ready long before a warning is ever issued. Having your supplies packed and accessible means you can skip the frantic search for flashlights, medications, and important papers. Instead, you can focus on the most important tasks: communicating with your family, grabbing your pets, and getting to safety. A pre-made kit is a core part of a larger Wildfire Action Plan, allowing you to act decisively when every second counts.
What Emergencies Should You Prepare For?
While your primary concern might be wildfires, a well-stocked emergency kit is an all-purpose tool. The same supplies that help you through a wildfire evacuation are invaluable during an earthquake, extended power outage, or severe storm. The best approach is to build a kit with the basics and then customize it for the specific risks in your area. For those of us in California, that means adding items like N95 masks for smoke and keeping digital and physical copies of insurance documents. Your kit becomes a versatile safety net, ready for whatever challenge comes your way.
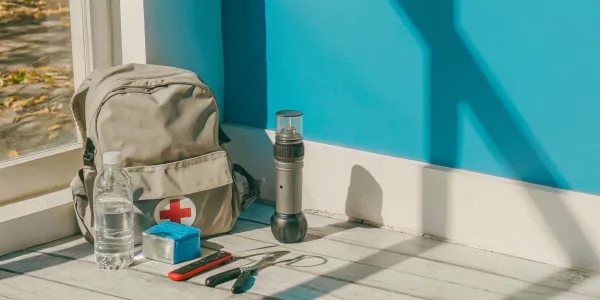
The 20 Essential Items for Your Emergency Kit
When an evacuation order comes, you won’t have time to think. Having a well-stocked emergency kit is one of the most important steps you can take to protect yourself and your family. Think of it as your go-to resource for the first 72 hours of an emergency, whether you’re sheltering in place or have to leave. Building your kit now gives you a sense of control in an uncertain situation. This list covers the essential items every household needs, broken down into key categories. Use this as your starting point, and then customize it for your family’s specific needs.
Water and Food
When utilities are down, clean water and ready-to-eat food are your top priorities. You can't rely on tap water being safe or grocery stores being open. Having your own supply means you can stay hydrated and nourished without leaving a safe area. Aim for enough to last at least three days.
- One gallon of water per person, per day: This ensures you have enough for drinking and basic sanitation.
- Non-perishable, easy-to-prepare food: Pack items like protein bars, canned goods, dried fruit, and peanut butter that don't require cooking.
- A manual can opener: A simple, non-electric tool is essential for accessing canned food.
- Food and water for your pets: Remember to pack their specific food and extra water to last several days.
Health and Safety
Minor injuries can become major problems during an emergency, and wildfire smoke presents a unique threat to your respiratory health. A well-stocked kit ensures you can handle scrapes, manage chronic conditions, and protect your lungs from harmful particles.
- A complete first-aid kit: Your kit should include bandages, antiseptic wipes, and pain relievers. The American Red Cross has excellent checklists for what to include.
- A supply of essential prescription medications: Keep at least a seven-day supply of any necessary medications, along with a list of your prescriptions and dosages.
- N95 masks to protect from smoke and dust: These are critical for filtering out the fine particulate matter in wildfire smoke.
- Personal hygiene items: Packing soap, toothbrushes, and toilet paper helps maintain health and a sense of normalcy.
- A whistle to signal for help: A loud whistle is much more effective than shouting if you need to attract attention from rescuers.
Light and Communication
In a widespread power outage, your phone and the internet will be unreliable. Staying informed with official updates is crucial for your safety, so you need backup systems that don't depend on the grid or cell service.
- Flashlights with extra batteries: Have several, and make sure they work. Headlamps are a great hands-free option.
- A battery-powered or hand-crank radio: This is your most reliable link to emergency broadcasts from NOAA Weather Radio and local authorities.
- A portable charger for your cell phone: A fully charged power bank can give you critical extra time to communicate.
- A physical list of emergency contacts: Don't rely on your phone's memory. Write down key numbers.
- Local maps: If GPS fails, paper maps can help you find evacuation routes or shelters.
Documents and Finances
After the immediate danger passes, recovery begins. Having access to your essential documents and some cash will make the process much smoother. This is your first step toward rebuilding and handling insurance claims.
- Copies of insurance policies and IDs: Store digital copies on a password-protected USB drive and have paper copies in a waterproof bag.
- Cash in small bills: Credit card systems and ATMs will likely be down.
- Photos of your property for insurance claims: Take pictures of your home and valuables beforehand to document their condition.
- Copies of important medical records: Include records for anyone with chronic conditions to ensure continuity of care.
Shelter and Tools
These items provide basic protection and comfort if you are forced to evacuate or shelter in a place without power. A few simple tools can also be critical for safety in and around your home.
- Emergency blankets or sleeping bags: Mylar space blankets are lightweight and retain body heat effectively.
- A change of clothes and sturdy, closed-toe shoes: You need to be able to move safely over potentially rough terrain.
- A multi-tool or wrench to turn off utilities: Important, but only turn off utilities like gas if you smell a leak or are instructed to by officials.
- Waterproof matches or a lighter: Keep them in a waterproof container to ensure they work when you need them.
- Plastic sheeting and duct tape: These can be used to seal windows or create a temporary emergency shelter.
How to Store Your Kit So It's Ready When You Are
Building your emergency kit is a huge step, but where you keep it is just as important. A perfectly packed kit is useless if you can’t find it or get to it when seconds count. The goal is to make your kit a seamless part of your emergency plan, stored in a way that makes it easy to grab and go. Think about your daily routines and the layout of your home to find a spot that is both out of the way and instantly accessible. This isn't just about storage; it's about creating a system that works under pressure. By thinking through the logistics now, you’re giving yourself a critical advantage in a real emergency.
Choose the Right Location
The best spot for your kit is somewhere you can get to without thinking. During an evacuation, you won't have time to hunt through closets or dig around in the attic. Federal emergency officials advise you to "keep a kit in a known place, ready to grab if you need to leave quickly." Think of a central, accessible location like a hall closet near your main exit, in the garage by the door to your car, or in a mudroom. The key is consistency. Everyone in your household should know exactly where the kit is. Make its location a part of your family’s Wildfire Action Plan so there’s no confusion when it matters most.
Select the Best Container
Your emergency supplies need to be portable. You should be able to grab everything and get out the door without a struggle. That’s why it’s smart to pack everything in one or two easy-to-carry containers, like large duffel bags or sturdy plastic bins. If you have a larger kit for your family, consider using a container with wheels, like a rolling suitcase or a large bin on a dolly. This makes it much easier to move a heavy kit quickly, especially if you need to walk some distance to your car. Label the containers clearly as "EMERGENCY KIT" so they are easy to identify.
Protect Your Supplies from Damage
Your kit needs to be ready to use after sitting in storage for months, so protecting its contents is crucial. Moisture, pests, and temperature changes can ruin food, batteries, and important documents. A simple and effective step is to "store items in airtight plastic bags" before placing them in your main container. This is especially important for electronics, matches, and paperwork. For food, the rule is to "keep canned food in a cool, dry place" to prevent spoilage and preserve its shelf life. A garage or basement can be a good spot, as long as it doesn't experience extreme temperature swings or dampness.
Set a Simple Maintenance Schedule
An emergency kit is a living document of your family’s needs, not a time capsule. It requires regular check-ins to stay effective. It’s a good practice to "review your kit every year and update it as your family's needs change." A new baby, a new prescription, or even a change in your children’s clothing sizes are all reasons to update your supplies. Set a recurring reminder on your phone or calendar to check your kit every six months. During this check, swap out any food, water, or batteries that are nearing their expiration dates. This simple habit ensures your kit is always fresh and reliable.
Customize Your Kit for Your Family's Unique Needs
A generic checklist is a great starting point, but your family isn’t generic. The most effective emergency kit is one that’s built specifically for the people (and pets) you’d be grabbing on your way out the door. Taking the time to think through everyone’s individual needs will make a stressful situation much more manageable.
Account for Medical Needs and Prescriptions
If someone in your family relies on daily medication, this is one of the most critical parts of your kit. Pharmacies may be closed or inaccessible during an emergency, so pack at least a seven-day supply of all essential prescription medicines. Don't forget other medical necessities like glasses, contact lenses and solution, hearing aids with extra batteries, or insulin. The American Red Cross has a comprehensive list of survival kit supplies to help you think through everything you might need. Make a list of all medications, their dosages, and the prescribing doctor’s information to keep with your supplies. This small step can prevent a major health crisis during an evacuation.
Pack for Children and Infants
When you have little ones, their needs go beyond basic food and water. For infants, you’ll need to pack ready-to-use formula, bottles, diapers, and wipes. For older children, think about what will keep them calm and occupied. A favorite book, a small game, or a comforting stuffed animal can make a world of difference when routines are disrupted. Pack familiar, non-perishable snacks they enjoy. Involving your kids in packing their own small "go-bag" with a few toys can also help them feel more in control and prepared. The goal is to create a sense of normalcy and security for them in a chaotic time.
Don't Forget Your Pets
Our pets are family, and they depend on us entirely during an emergency. They need their own grab-and-go kit with enough food and water for several days. Pack any medications they take, a copy of their vaccination records, and a photo of you with your pet in case you get separated. Ready.gov has a helpful guide to help you build a kit that includes your pets. Make sure you have a sturdy leash, harness, and a carrier ready to go. A favorite toy or blanket can also help reduce their stress during an evacuation. Don't wait until you hear an evacuation order to figure out how you'll transport a scared animal.
Adapt Your Kit for Local Risks (Like Wildfires)
Because we live in areas threatened by wildfire, our kits need a few specific additions. N95 masks are essential for protecting your lungs from smoke. It’s also wise to have durable leather gloves for handling hot or sharp debris. Since wildfire evacuations can happen with little warning, having your important documents, photos, and financial information digitized and also in a fireproof bag is crucial. Thinking through the steps for evacuation and readiness ahead of time is the best way to protect your family. Your kit is a key part of a larger, personalized wildfire action plan that gives you a clear path forward when every second counts.
Why You Need More Than One Kit
Thinking about emergency preparedness can feel overwhelming, but breaking it down makes it manageable. A common mistake is creating one giant, all-purpose emergency kit. While it’s a good start, a single kit rarely works for every scenario. If you’re ordered to evacuate your home, you can’t exactly haul a 50-pound storage bin into your car. And if you’re told to shelter in place, a small backpack won’t have enough supplies to last your family for several days.
The key is to think strategically about where you might be and what you might need in different situations. A true preparedness strategy involves having multiple, specialized kits ready for specific circumstances. This approach ensures you have the right supplies on hand whether you’re stuck at home, evacuating in your car, or caught at the office. It’s about creating a flexible system that works for your life, giving you peace of mind that you’re ready for whatever comes your way. Building these kits is a concrete step you can take to protect yourself and your family, turning anxiety into action.
Your "Stay-at-Home" Kit
This is your command center for any emergency that requires you to shelter in place, like a wildfire that makes evacuation unsafe or a major earthquake that damages roads. Your stay-at-home kit should be the most comprehensive one you build, designed to help your household survive without outside help for at least 72 hours, though a week or more is even better. Think of it as your personal stockpile of essentials. You’ll want to build a kit with enough water, non-perishable food, medications, and sanitation supplies to keep everyone safe and comfortable. Store it in a cool, dark, and easily accessible place like a garage, closet, or basement. Having this kit ready means you won’t have to rush to the store when a crisis hits.
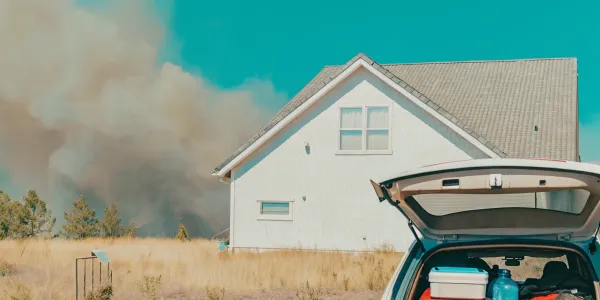
Your "On-the-Go" Car Kit
An evacuation order can come with little warning, and the last thing you want is to be stuck in traffic unprepared. That’s why an on-the-go kit for your car is so important. This kit ensures you have critical supplies if you’re forced to leave home quickly or get stranded on the road. It doesn’t need to be as extensive as your home kit, but it should include water, high-energy snacks, a first-aid kit, a phone charger, and a flashlight. It’s also wise to include warm blankets and comfortable walking shoes. This kit serves a dual purpose: it’s essential for a wildfire evacuation, but it’s also incredibly useful for everyday roadside emergencies, making it a practical tool for any driver.
Your Workplace Kit
We spend a huge portion of our lives at work, but it’s a place we often forget to prepare for an emergency. If a disaster strikes during the workday, roads could be closed, and you might be stuck at your office for 24 hours or more. A small, personal kit at your desk or in a locker can make a huge difference. Pack a water bottle, non-perishable snacks, any personal medications you need, and a pair of comfortable walking shoes in case you have to travel home on foot. Having your own supplies means you won’t be reliant on your employer, giving you a sense of control in a chaotic situation. It’s a simple step that completes your preparedness circle.
Your "Grab-and-Go" Evacuation Bag
When you get an evacuation order for a wildfire, you may only have minutes to leave. This is where your "grab-and-go" bag becomes the most important item you own. This portable bag should be packed with the absolute essentials you’ll need for the first 72 hours. It must be light enough to carry and stored somewhere you can grab it without thinking. Include copies of important documents, cash, prescription medications, a first-aid kit, and a change of clothes. This isn’t your long-term survival kit; it’s your lifeline. Having this bag ready is a core part of any solid Wildfire Action Plan, ensuring you can get yourself and your family to safety quickly and efficiently.
Keep Your Kit Fresh and Ready: A Simple Maintenance Plan
Building your emergency kit is a huge step toward protecting your family. But it’s not a one-and-done task. An emergency kit is a living resource that needs regular attention to be effective when you need it most. Think of it like changing the oil in your car—it’s routine maintenance that prevents a major breakdown. Creating a simple, repeatable plan ensures your supplies are fresh, your gear works, and your kit is always ready for action. This isn't about adding another complicated chore to your list; it's about creating peace of mind with a few easy habits.
Check Your Kit Every Six Months
Set a recurring reminder on your phone or calendar to check your kit every six months. A good time to do this is when you change your clocks for daylight saving time. During this check, you’ll want to take everything out and inspect it. Look for expired food, water, or medications. Check for dead batteries in flashlights and radios. According to federal emergency preparedness guidelines, you should check your kit at least twice a year to replace expired items and ensure everything is in working order. This simple habit prevents the unwelcome surprise of finding spoiled food or a dead flashlight during a real emergency.
Know When to Replace Food, Water, and Batteries
When you inspect your supplies, pay close attention to expiration dates. Canned goods can last for years, but it’s important to store them properly in a cool, dry place to maximize their shelf life. Boxed or bagged foods should be kept in airtight containers to protect them from pests and moisture. A great strategy is to rotate your supplies. Move items nearing their expiration date from your kit into your kitchen pantry for regular use, and replace them with fresh supplies. Do the same for batteries and any over-the-counter medications. This "first in, first out" method keeps your kit fresh without wasting resources.
Update Your Kit for Every Season
Your family’s needs are always changing, and your emergency kit should change with them. A kit you packed two years ago might not have what you need today. Did you have a baby? You’ll need to add formula, diapers, and other infant supplies. Do you have growing kids? Make sure the extra clothes in your kit still fit. Have you or a family member started a new prescription? Add a backup supply to your kit. It’s also smart to think seasonally. In the fall, you might add extra warm blankets or hand warmers. In the spring, you might add more water to prepare for summer heatwaves.
Test Your Gear Before You Need It
Owning a hand-crank radio or a multi-tool isn't enough; you need to know that they work and how to use them. A common mistake is assuming that having survival gear is enough—without actually knowing how to use it. Take a few minutes during your six-month check to test your equipment. Turn on the flashlight. Tune the radio to a local station. Unfold the emergency blanket. If you have a water filter, read the instructions so you’re not fumbling with it in a crisis. This practice builds confidence and ensures your tools are reliable. Knowing your gear is just one part of a solid emergency strategy, which is why creating a complete Wildfire Action Plan is so important for your family's safety.
Related Articles
- Wildfire Action Plan | Comprehensive Wildfire Preparedness & Emergency Planning
- Wildfire Action Plan | Comprehensive Wildfire Preparedness & Emergency Planning
- Wildfire Action Plan | Comprehensive Wildfire Preparedness & Emergency Planning
- Wildfire Action Plan | Comprehensive Wildfire Preparedness & Emergency Planning
- Wildfire Action Plan | Comprehensive Wildfire Preparedness & Emergency Planning
Frequently Asked Questions
This feels overwhelming. Where's the best place to start? I completely understand. The key is to start small to build momentum. Focus first on building your "grab-and-go" bag. This is the single, portable bag you would grab if you had only minutes to leave. Gather a change of clothes, a few bottles of water, some non-perishable snacks, a small first-aid kit, and your essential medications and documents. Completing this one task is a huge win and the most critical step for evacuation readiness. You can build out your larger home kit from there.
What's the difference between a "stay-at-home" kit and a "grab-and-go" bag? Think of it as the difference between a pantry and a purse. Your "stay-at-home" kit is your pantry—a larger stockpile of supplies stored in a closet or garage to help you shelter in place for three days or more without power or water. Your "grab-and-go" bag is your purse—a lightweight, portable kit with just the absolute essentials to survive for the first 72 hours of an evacuation. You need both, as you never know if you'll be ordered to stay or to leave.
What are the most important items specifically for a wildfire evacuation? While all the basics are important, a wildfire presents unique threats. The most critical items to add are N95 masks for everyone in your family to protect their lungs from smoke. You should also have sturdy, closed-toe shoes and leather gloves in your kit for navigating potentially hazardous debris. Finally, having digital and physical copies of your insurance policies, IDs, and other vital documents in a fireproof, waterproof bag is essential for a smoother recovery process.
How can I make sure my kit is always ready without it becoming a huge chore? The easiest way is to set a simple, repeating reminder on your calendar—once every six months is perfect. A great time to do this is when you change your clocks for daylight saving time. When the reminder pops up, take 30 minutes to swap out any food or water nearing its expiration date by moving it into your kitchen pantry to be used. At the same time, test your flashlight and radio batteries. This simple habit of rotating your supplies ensures everything is fresh and functional without being wasteful or time-consuming.
My family has specific medical needs. How should I handle prescriptions? This is one of the most important parts of personalizing your kit. You cannot rely on pharmacies being open or accessible during a disaster. You should have at least a seven-day supply of all essential prescription medications packed in your grab-and-go bag. It's also smart to include a waterproof list of all medications, their dosages, the prescribing doctor, and the pharmacy's phone number. Don't forget other necessities like extra glasses, contact lens solution, or hearing aid batteries.